Merry & Bright

2nd Place Winner

Hello my friends....I just wanted to post this card I have entered in the Boch's Creations challenge. She has a giveaway this week from Stop & Scrap. I am off to the "cottage" for the rest of the week (which means I will be in card making withdrawal), but I get to spend time with my grandson...woohoo!!!

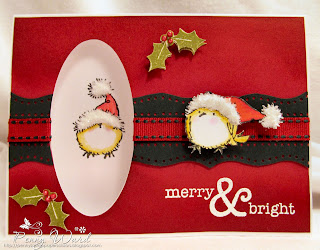
Don't you just love these little chicks from Penny Black...they are so cute!
I started with a white card base and sent it through the Silhouette machine to get the oval cut out.
Added a strip of edging punched with Martha Stewart and a bit of ribbon.
Fussy cut the chicks and holly, heat embossed sentiment .
Hope you enjoy!

Let's go Shopping:
Card stock - white, red & green
Stamps - Penny Black Winter Wonderland & Let it Snow
Liquid Pearls - Rouge
Silhouette Machine
Tim Holtz distress ink - Fired Brick & Forest Moss
Glossy Accents 
Scrap of ribbon

Thanks for peeking...

3

Celebrate


Hello friends....have you had the busiest week?!? I know I have....a ton of friends and family for Thanksgiving, then of course the wonderful sales the next day (especially at the craft stores). So I am finally posting this weeks challenge card.
This card was so simple!!!!!  
White card stock for the base, stamp sentiment with Tim Holtz Weathered Wood. Attach a wide ribbon to card stock (helps support ribbon) and trim to fit card width.
Dark Aqua blue card stock cut with spellbinders, attached to card with foam adhesive.
Stamp butterfly two times, colored with Faber Castell colored pencils, fussy cut, use liquid Pearls and attach to die cut circle with glossy accents and foam adhesive. A few faux stitching lines and you are done.

Hope you enjoy!

Let's go Shopping:

White and Dark Aqua card stock
Penny Black stamps - Bohemian & Celebrate
Spellbinders Standard large Circles
Tim Holtz distress ink - Weathered Wood
Faber Castell colored pencils - Greens & Blues
Liquid Pearls - White Opal & Peacock
Ribbon

Thanks for peeking...
1

Candy Cane Wishes


Hello my friends.... Hope you are having a wonderful weekend. I have had a couple of interruption free card-making days and I wanted to share this card with you. I love the uniqueness of this card, yet it was simple to assemble.
Make a standard size card base (4.25 x 5.50 ), add a piece of card stock cut just a bit smaller than base. Cut another piece of card stock just a bit smaller again, and add a scrap of patterned paper to the back. On this piece you will want to curl the corner forward quite a bit. Now attach a wide piece of ribbon diagonally across and under the "curl".
 Stamp and color 3 wreaths. Attach with embroidery floss. One wreath is glued to card stock, and the other two wreaths have foam adhesive at two different heights.
Emboss sentiment and add Liquid Pearls randomly.
Hope you enjoy!

Let's go Shopping:
Card stock - white and dusty blue
Penny Black stamp - Candy Cane Wishes
Faber Castell colored pencils - greens
scrap of patterned paper
Embroidery Floss - Dusty Blue
Liquid Pearls - Ocean Blue
White embossing powder
Uniball gel pen - white
scrap of ribbon to match
Glitzy Brad

Thanks for peeking...
4

Golden Presents


Let's go Shopping
Gold Glitter paper
White cardstock
Navy/Gold Patterned paper
Penny Black stamps - Let it Snow & Little Elf Present
Lapis  & Gold embossing powder
Kreinick Gold Braid
Navy jewels
Gold Ribbon

Thanks for peeking...
5

Make your own Cuttlebug Folder


Hello my friends...OK two posts in one day...aren't you lucky!

I wanted to show you all how to make your own "folders" for your Cuttlebug/Sissix.
I know Mr. Cuttlebug would not be happy with me...oops.
Cut your design by hand or use a Silhouette/Cricut. You will want 3 layers of heavy cardstock of the same design, then glue on top of each other to make a small stack. 
ABOVE: I die cut My Favorite Things Flourish 3 times and glued together. I then stamped the Christmas ornaments from Penny Black Christmas Treasures three times and handcut, then glued into a stack.
Take a piece of cardstock and apply your cut stacks with temporary adhesive as desired.
Follow this recipe for a beautiful homemade embossing:
"A" plate
"C" plate
your homemade folder
Cardstock to emboss
Rubber mat
4 pieces of scrap cardstock (as a wedge)
"B" plate
Run through your Cuttlebug

WALA!!!

The possibilities are endless ... Have Fun!
3
For Two Peas in a Bucket - Copic contest

Hello my friends....Saw this contest at Two Peas and of course who wouldn't want to win some free Copics?!?

Card base is Black cardstock. Cut White cardstock just a bit smaller than base, inked around the edges with  Gray chalk ink, stamped background, then ran a distress ink pad around the outside of this cardstock. Scored this panel and added Liquid Pearls randomly. Sentiment was embossed.
Stamped the flower twice and colored with Copic markers R24, R27, R29, then fussy cut. Button was also colored with Copic R29, and tied a bow with Kreinick Braid in Silver Metallic.
Die cut frame from Black cardstock, then used glitter glue on top.
Attach die cut with foam adhesive and add flower by doubling up on the foam adhesive. Curl top corner, then attach to card base. 
Hope you enjoy!

Let's go Shopping:
Cardstock - White 7 Black
Studio G - Gray ink
Ranger Distress ink - Black Soot
Penny Black stamp - To You, Letter Background
Spellbinders die - Labels Four
Liquid Pearls - White Opal
Momento ink - Tuxedo Black
Embossing powder - Silver
Stickles - Black Diamond
Button from stash
Braid - Kreinick Metallic Silver


Thank for peeking...

0

Happy Holidays in Silver


Hello my friends....do you feel like you have been making Holiday cards for about six months now? I started in July and have been making them ever since. Most of the cards went to Operation Christmas Card but now I am making them to send to friends and family. 
This was a really simple card to make. Lots of black and white with just a touch of gold. Flourish was embossed with silver powder as was the sentiment. For the tree, I sprinkled a little of the gold and silver embossing powder, and I really like the effect. I also used silver ink pad to distress around the tree, then attached with foam adhesive. Run a silver stamp pad around all edges as it gives it a nice finish. Add a few gem stones and your card recipients will think you spent days making their holiday greeting.
Hope you enjoy!

Now let's go Shopping:
Cardstock - Black & White
Embossing powder - gold and silver
Penny Black stamp - Winter Wonders
Flourish Die cut - My Favorite Things
Silver ink pad
Faux gemstones
Foam Adhesive

Thanks for peeking...
3

Penny Black Winter Wonders


Hello my friends.......I had this card in mind and once I had it put together I am rethinking my supplies. There is no way you could mail this card as the gold beads are sure to be crushed. Maybe do the same concept with gold braid. I do love how the background turned out. I found a bottle of Liquid Goldleaf (it's a paint), added a couple of drops to a mini mister filled with water. Shake and spritz. Oh, and the little bit of silver you see is a very thin sheet of metal that I ran through the cuttlebug. Too fun!!!
Anyway...I hope you enjoy and gain inspiration for your own handmade card.

Let's go Shopping:
Cardstock - White & Shimmer Gold
Liquid Goldleaf paint
Creative Metal - Silver
Penny Black stamps - Christmas Star & Winter Wonders
Strand of gold beads
Embossing powder - White & Gold
Vellum
Faux Pearls
Gold Braid
"Hope" silver bead

Thanks for peeking...

3

Joy...my favorite stamp of the moment


My new favorite stamp (only because I just got it).
This card was so fun to make because of all the scoring.
Christmas Star was embossed on vellum and again stamped on glossy paper, then colored with Copic markers. Add some Liquid Pearls and a sentiment and you have a fairly simple card to mass produce.
Enjoy!

Let's go shopping:
Cardstock - White and Dark Green
Vellum
Glossy paper - white
Penny Black stamps - Christmas Star & Winter Wonders
Copic markers
White embossing powder
Martha Stewart Scoring board
Liquid Pearls - Opal White
Spellbinders Labels Four
Tag punch
Ribbon

Thanks for peeking...
2
Back to Top