Penny Black Blog Hop Entry

For Penny Black Blog Hop Challenge

I so enjoyed the Blog Hop this morning at Penny Black Inc. and Flower-Soft. I had to really rush around to accomplish this card as my DH and I are traveling to the "cottage" this weekend to see the grand baby. I was able to pack while waiting for portions of the card to dry. Don't ya just love multitasking???

The card that inspired me this morning was by Debbie Seyer

Let's go Shopping:
Penny Black card stock - Spring Meadows
Recollections card stock - Metallic White & Purple
Spellbinders - Labels Four
Penny Black stamp - Tigress
Tim Holtz distress ink - Forest Moss & Old Paper
Offray Ribbon
Button colored with Copic marker
Purple twine
Marvy punch - Labels
Martha Stewart Scoring Board
Glossy Accents
Foam Adhesive

Thanks for peeking...
3

I Love You


My take on Jenyfur's sketch at the Penny Black blog.

Can you believe that the holidays are over? 
Now it is time to start thinking about Valentines cards.
I don't think there is anything more beautiful than an all white card, and this sketch was just itching for white.
Much happiness in the New Year and may all your days be crafty!

Let's go Shopping:
Wausua card stock - White
Cuttlebug folder - Musical Flourish
Kreinick Braid - Metallic White
Penny Black stamps - To You & Winter Wonderland
Carl - Small Heart Punch
We R' Memories Corner Rounder
EK Success punch - 1" Circle
Fiskars punch - Scalloped Circle
Versasfine ink - Black Onyx
Glossy Accents
Foam Adhesive
Stickles - Fired Brick
Liquid Pearls - White Opal

4

This week at A Crafting Start we are talking texture...on a card, a scrapbook page, a journal cover...whatever you are making, texture or dimension will be more eye appealing.
For the card above I started with a white card stock base. I "masked" the base with 2 circles, then used distress inks on the rest of the card. Remove the masks and you have two white circles just waiting to be decorated.
I used spellbinders die cuts for the snowflakes, cutting two each of Navy Blue & Silver card stock. Using foam adhesive I attached these to the two white circles. The bows are made of cheesecloth, sentiment was heat embossed. 
You can find "texture" in lots of places around your house or garage to incorporate into your craft projects. 
Be brave...try something out of the ordinary.

Let's go Shopping:
Cardstock - White, Navy & Silver
Tim Holtz distress inks - Faded Jeans & Chipped Sapphire
Spellbinders - Create a Flake 3
Penny Black stamp - Let it Snow
Cheesecloth
Glossy Accents
Tombow temporary glue stick

Thanks for peeking...

1

Deck the Halls with lots of embossing


Hello my friends.....Have you clicked on A Crafting Start lately? This is a really good site for beginners in scrapbooking and cardmaking. This weeks challenge is for dry embossing. 

The above card was first run through the cuttlebug with the Musical Flourish folder using Coredinations red card stock. I then sanded the card stock while it was still in the folder.
I also used the Sizzix Santa Baby folder for the sentiment.
Die cut of the holiday ball, then applied green glitter.
Cute little chicks from Penny Black Winter Wonderland were stamped, colored and fussy cut. Their hats have glossy accents and the "fur" is done with Aleene's True Snow with Twinklets Diamond Dust on top.
Add a little ribbon and faux stitching.

Hope you enjoy!

Let's go Shopping:
Card stock - white and red
Penny Black stamp - Winter Wonderland
Cuttlebug embossing folder- Musical Flourish
Sizzix - Winter Botanicals & Santa baby
Spellbinders - Large Deckled Rectangles
Aleene's True Snow
Twinklets - Diamond Dust
Uni-ball gel pen - white
Green glitter glue
Glossy Accents
Foam Adhesive
scrap of ribbon

Thanks for peeking...
2

Domino Necklace

Click on picture for an enlarged view

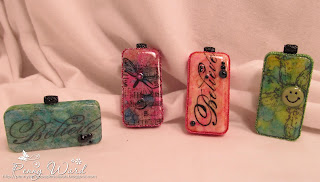
Hello my friends...I have been away at the "cottage" but I just wanted to show you what I have been up to since I returned home.
I am making domino necklaces for my mom and sisters. They turned out toooo cute!
(Ignore all the smiley faces, it is something we sisters started after our brother passed away..he loved them, so we carry on).

Here's what you need to do:

Take a domino and pat it with a felt pad that has been dotted with Copic refill ink or you can use TH alcohol inkers. Let dry (about 3 minutes). Stamp your image on tissue paper with Stazon or Versafine ink.
Coat the dry domino with Mod Podge and while it is still tacky, apply your stamped tissue paper. Be careful...it is tissue paper after all, pat out any air bubbles, trim the tissue paper so it just wraps over the edge of the domino.
Now coat the top and sides of domino with Mod Podge again. Let dry! I know you want to touch it, but don't...it will leave finger prints.
After the domino is dry, apply really good double sided tape to the sides at the top edge. Add a barrel bead or a jewelry bail to the top center. Now roll all sides in Martha Stewart glass beads. This is where I found out that not all glass beads are equal. Trust me...go for the Martha Stewart beads. Add embellishments such as faux pearls.
Now lay the domino flat and start "icing" the stamped area with Glossy Accents. Put just a touch of the Glossy Accents around the barrel bead also...you want that part of the necklace to be strong.
Let dry!  Let dry!  Let dry!
(I know you want to test it, but remember what I said about the fingerprints...walk away, go do laundry, the dishes, something). Do not test it for 12 hours.
Add cord or pretty ribbon and you have a beautiful necklace to keep or give as a gift.
Have fun!

Shopping List:
Domino's 
Copic refill inks or Tim Holtz alcohol inkers
Double sided tape
Martha Stewart Glass Beads
Barrel bead or Jewelry Bail
Stamps used left to right:
Penny Black - Winter Wonders, Butterfly Suite, Winter Wonders...again, Poppy Poem (stamped 5 times in a circle pattern)
Mod Podge
Glossy Accents
Small embellishments
2

Family Shadowbox


I wanted to show you the shadowbox I made for my Mom & Dad (ok...I made one for myself too).
The top white part is stamped with Penny Black Letter Background and the base of the sentiment is stamped with Paisley Outline. The cutest part of course is not picked up by the camera, but the picture of all of us has been fussy cut, then I cut out just the baby and layered all three pictures on top of each other.

It turned out nice. 
The background of the photo is the backyard at the "cottage"...I could sit on that porch forever.

Thanks for looking and I hope it inspires you....

Let's go Shopping:
Photo printed three times
Shadowbox
Patterned Paper
Silver Metallic Heart Button
Blue Mesh Ribbon
Silver Brads
Scor-Pal
Scor-Bug


3

Believe


For this weeks challenge of layering a card at A Crafting Start.

Begin with a card base of White card stock.
Cut your first layer of white card stock just a bit smaller than base, ink the edges with Tim Holtz Weathered Wood. 
Next layer is cut just a bit smaller than the previous layer, then cut a tree shape in the center. Again ink the edges with Weathered Wood ink, stamp sentiment with Watermark ink, add Lapis embossing powder and heat set, then add bow.
This layer is attached with foam adhesive.
Stamp tree from Penny Black Christmas Treasures two times with the same Weathered Wood ink. Fussy cut one tree and add to card base with foam adhesive. Fussy cut the other tree and trim into four sections following the branch lines. Put just a touch of glue at the top of the tree and foam adhesive at the bottom of the first section. Do this same procedure with the next three sections. This really gives the tree dimension.


Let's go Shopping:

White card stock
Penny Black stamps - Christmas Treasures & Winter Wonders
Tim Holtz distress ink - Weathered Wood
Foam Adhesive
Lapis embossing powder
Glossy Accents (I use this for gluing )
Blue cord
Silhouette Machine for tree die cut

Thanks for peeking...
1
Back to Top