Shabby Thanks

This card was selected as a weekly favorite at Splitcoast Stampers.


Homework time again for the Kick Start Online Class.
I went with a shabby look today. I love how the stamp from Penny Black called Puzzle Parts, matches the Spellbinders Lattice die perfectly...who knew?!?
Some lace, a lot of distress inks, rolled flowers and a tag punch.
I think shabby means ....pile it on.

anywho.....Thanks for stamping by.......

4

Some new Technique


Homework for the Kick Start Online Class today is trying a new Technique.
So.... I did !!!
The burgundy panel was stamped, clear heat embossed, then I used a white ink pad and rubbed over it. Kinda gives it a foggy effect. Because I am short on time today, I added store bought roses as an embellishment. I left the sentiment off because this card could be used for a lot of occasions, so I will wait and put something on the front of the card when I am ready to send it.

Thanks for stamping by....
5

Distress Stain Tag


Another post today for my Homework from the Kick Start Online Class.
Something quick, out of my comfort zone.
I have Distress Stains and I have never used them... OK, call me intimidated...but I used them on this tag. 
Really like how the Brushed Pewter stain turned out (even though you can't see it in the picture).

Thanks for stamping by...

Let's go Shopping:
Ranger - Distress stains -Brushed Pewter, Fired Brick, Broken China
Memory Box -Vivienne Butterfly die
Darice - Blue & White Metallic cord
Stampers Anonymous - Natures' Elements
Idea-ology reinforcers

4

Hello


Hello friends....quick post today...I have been attending class at Kick Start Online Class with Kristina Werner and Jennifer McGuire and if you ever needed inspiration to break out your cardmaking supplies...I suggest you take this class. It is only day 7 of a two week class, I am so impressed with all the ideas I have seen and heard.
We have homework every night (yikes, I am so behind), but I wanted to post my card that was inspired by Kristina. I used 3 products (besides tools, adhesive and base card). This is my take on her card.

Thanks for stamping by.....

Let's go Shopping:
Martha Stewart - Button punch
Uni-ball gel pen - white
MME 6 x 6 pad - AllSpice


7

Happy Day


Hello my friends. Just a quick post today. I am taking a two week course called Kick Start that is being presented by Kristina Werner and Jennifer McGuire and this is the first card I have made while attending.
Hope you all are having a really crafty day.

Thanks for Stamping by.....

Let's go Shopping:
Navy, Burnt Orange and Mustard card stock (Recollections)
Air Vent & Happy Day dies (Memory Box)
White gel pen (Signo Uni-ball)
Scoring board (Scor-Pal)
Offray Ribbon
6

Sand Shaker Card


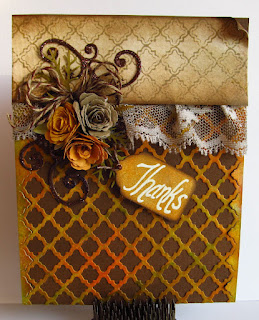
Hello my friends, today I have a shaker card for you. I live a stones throw from Clearwater Beach, Fl and while I was there recently, I thought…oh oh oh I have to make a shaker card with sand and shells. So if you are reading this tutorial from somewhere cold weathered…I hope this cheers you up!

Just a note before I begin…. have you ever finished a card and then thought…hum I don’t really care for that? Well this happened to me with the card you see pictured above. In the future, I would cut a second oval for the shaker part so you don’t see the Paisley embossing behind the sand…just saying!

So…….
Let’s make a card…………….

Cut a base card 5 1/2 x 4 1/4.

Cut a beige card stock just a bit smaller than your base. Dry emboss.

Cut a piece of Kraft card stock 5 1/4 x 3 1/2. Dry emboss.

Die cut desired oval from Kraft card stock. Die cut oval from clear plastic sheet and attach.


Die cut thin foam three times (to give height for shells). Cut centers from foam ovals. and attach.

Attach all embellishments to card base EXCEPT shaker.

Turn shaker embellishment upside down and apply glossy accents to foam leaving about a two inch opening at the top free of glue. Flip and attach to your card. LET DRY !!!


Gently lift unglued portion to pour in sand and tiny shells. Apply glue to this top portion with a pin or craft knife and let dry.
 (I know you are tempted to shake it..but don’t! Your sand will adhere to places you don’t want it to be…trust me!)

Hope you enjoyed the card and may you have a really crafty day.
Thanks for stamping by…..

PS… have you seen all the new items and cartridges at www.scrapbookpal.com ? My wish list just keeps getting longer.

Let's go Shopping:
Watercolor Paper (Canson)
Cream & Kraft card stock (Recollections)
Natural twine (Darice)
Umbrella sand stamp set (Stampendous)

3

3 Mini note cards


Mini note cards for challenge at Penny Black

Off to the cottage for the weekend, just wanted to post these note cards before I no longer have internet access.
Hope you have a wonderful weekend.

Let's go Shopping:

Stamps:  To You, Gratitude, Paisley Outline, Flower Gallery, Puzzle Parts (Penny Black Inc.)
Inks:  Memento-Olive Grove, Potter's Clay, Peanut Brittle, Rich Cocoa (Tsukineko)
         Picked Raspberry, Mowed Lawn, Salty Ocean, Crushed Olive, Faded Jeans (Ranger)
         Metallic Gold (Colorbox)
Liquid Pearls - Chocolate, Opal White, Enamel Accents White (Ranger)
Colored Pencils:  Reds, Blues, Greens (Faber Castell)
Dies:  Labels Seventeen, Labels Four, Grommet Tags (Spellbinders)
Faux Pearl
Twine colored w/ Picked Raspberry

 Thanks for Stamping by.....

3

Love Story


Hello my scrappy friends. Hope you are having a wonderful weekend.
I thought I would show you how adding a bit of scoring to a card can enhance its elegance.
 This is also my entry for the Design Team application at Scor-Pal.

Get out your Scor-Pal, Cuttlebug & stamps and
Let’s Make a Card…


Make a card base measuring 5 1/2 x 4 1/4. Attach Dark green card stock that is cut the same size.
On white card stock that has been cut just a bit smaller than base card, you will want to stamp all your sentiments in coordinating inks, leaving a large section blank to die cut an oval for the dominant sentiment.


With your Scoring board, lightly make score lines around each sentiment, then flip over and trace over for deeper score lines. Stamp and clear heat emboss your main sentiment on the oval you just cut out.


Die cut a smaller oval on light green card stock, so it is centered with the oval on the white card stock. Attach main sentiment to backside of light green card stock, and attach this to base card.


Using foam adhesive, attach top piece so it is centered over the main sentiment and square at the corners.

Die cut flourish & flowers from light green and white card stock respectively. Punch twigs from dark green card stock.


Attach as shown to front of card. Add Stickles to flower petals as desired.


Hope you enjoyed and thanks for stamping by…..

Let's go Shopping:
White, Light Green & Dark Green card stock
Stampin' Up stamp set - One in a Million
Stampendous - Clear Embossing Powder
McGill - Pine Branch Punch


3

Special Day


Hello scrappy friends, Today I have a fun flip card tutorial.

Grab your paper, Cricut, & Spellbinders and let’s get to work.


Start with a standard size card ( 5 1/2 x 4 1/4).
Place your oval die facedown of the inside left. Score lines above and below the dies center point.


Place on cutting plates where the scored line meets the edge of the plate. Run through your machine (Cuttlebug, Big Shot, etc.)


.

Now flip the whole thing over so the die is now laying on the cutting plate and you are looking at card stock with half of a cut image.


Lay your rubber embossing mat on top (and probably a couple of paper shims) and run through your machine again. This will emboss your other half instead of cutting it.


(NOTE: top half embossed, bottom half is cut)

Carefully remove the die. Your card should now look similar to the one pictured here.


Now it is just a matter of embellishing your card. As you can see I have inked the edges, rounded the corners and added some greenery and white roses. I also die cut a second floral oval, lined it up perfectly with the front oval and glued it to the inside of the card. Die cut flourish was also added to inside of card and lightly scored so the card would fold nicely.


I absolutely love these roses made with the  Bitty Blossoms die !


Hope you enjoyed the card today and are right now thinking of all the special wedding and anniversary cards you could be making with this design. Until next time….

Thanks for stamping by……

Let's go Shopping:
White card stock

2
Back to Top