Joy

NOTE: This card was selected to appear on the Penny Black blog for the final day of Cute to Elegant week.


Hello friends, back again today, as I couldn’t stand it unless I played all week at Penny Black. This is Day 4 of their Cute to Elegant sketch challenge, and my final card until Saturday.

Thanks for stamping by……


Let’s go Shopping:
Kraft card stock
Stamps - Zen, Christmas Treasures, Joyful Noise (Penny Black), Small Tag (Stampendous)
Air Vent die (Simon Says Stamp)
Watermark Ink (Tsukineko)
White embossing powder (Stampendous)
White gel pen (Uni-ball)
Cording (Kreinick)
Copic markers (Imagination International)
Glossy Accents, White & Black Enamel Accents (Ranger)
Scor-Tape (Scor-Pal)
1

Twinkle (Teal)


Hello scrappy friends, I am making Christmas cards today (why did I wait so long). This card is from a sketch at Penny Black for Day 3 of their Cute to Elegant Week.

I just don’t see how this tiny Fairy could be any cuter. Such a cute illustration by Mo Manning.

Super quick to make.

Thanks for stamping by….

Let’s go Shopping:
Aspen Frost paper pad(Basic Grey)
Red Card Stock (Michaels)
Fairy Stardust stamp (Penny Black)
Sentiment from Let it Snow (Penny Black)
Copic markers (Imagination Interneational)
Ribbon from scrap
Watermark ink (Tsukineko)
Red Embossing Powder (Stampendous)
Foam Adhesive (Scrapbook adhesive by 3L)
2

Joy to the World


Hello friends, A quick Christmas card using a sketch from 
Penny Black Day 2 of their Cute to Elegant Week.
Hope you enjoy!

Thanks for stamping by….

Let’s go Shopping:
Kraft  & White card stock
Stamp - Peace on Earth (Penny Black)
Inks - Paris Dusk, Danube Blue, Grey Flannel, Nautical Blue, Moonlight White (Tsukineko)
Clear embossing powder (Tsukineko)
Copic Marker (Imagination International)
Apron Lace edge punch (Fiskars)
Navy Cord (Darice)
White Gel Pen (Uni-ball)
Foam adhesive (Scrapbook adhesive by 3L)
1

Twinkle (Purple)


Howdy, It is Christmas card making day at my house. This card is from a sketch at Penny Black Day 1 of their Cute to Elegant week.


Thanks for stamping by….

Let’s go Shopping:
Heavyweight card stock (Gina K Designs)
Purple card stock (Michaels)
Stamps - Fairy Dust & Let it Snow (Penny Black), Dot Flourishes (Inkadinkado)
White Opal Liquid Pearls (Ranger)
Small & Large Circle dies (Spellbinders)
Copic markers (Imagination International)
White gel pen (Uni-ball)
3

Ho Ho Ho

This card is featured on Simon Says Stamp blog


When I saw this stamp at Simon Says Stamp, I just had to have it. So darn cute!!! The stamp and sentiment were illustrated by Kristina Werner and you know I LOVE anything she makes!

It is because of her and her "enabling" that I started making cards a couple of years ago. Since then, with the guidance of my online friend Elizabeth Allan (Penny Black Inc.), I have won several online challenges as well as having several works of art published in magazines.

So onto the card... 
The picture does not show the shiny silver background at the top portion of the card, which is a shame because it is so stunning. I used the Pewter stain by Tim Holtz.

Bottom portion was stained with Fired Brick. The whole panel was embossed with Scor-Pal and Scor-Bug.

Image was fussy cut, colored with Copic markers, twine attached to critters.

Sentiment was stamped and die cut, eyelet punched, then attached twine.

Hoping you have a wonderful, crafty day!

Thanks for stamping by…
8

Give Thanks

give thanks1

Hello my friends,  Fall is in the air and the holidays are right around the corner. This card would be a nice way to show friends and family how thankful you are, that they are in your life.

NOTE: Sentiment is a FREEBIE

Get out your Scor-Pal, some fall colored card stock and…
…..Let’s make a Card.

Start with a Kraft card base of 5 1/2 x 4 1/4. Score inside front of card at about 1/8 inch all the way around.


With Dark brown card stock cut at 2 3/4 x  4 inches, score down the center. Place top score line positioned at the 6” mark, turn cardstock until the bottom score line is at 6 1/4, score straight down.

give thanks5

Continue moving bottom of card over 1/4 inch and keeping top scored section at the same 6” mark.
When half the section is scored you will need to start back at the center and turn your card stock in the opposite direction to finish the scoring.

give thanks6

Sand this section and attach to lower portion of card base.

Cut a scrap of green card stock into a rectangle and emboss with Paisley folder. Attach to card base as shown. Cut a small section of the green card stock to make a small banner.

Cut 2 strips from Fall themed patterned paper, and one strip from white card stock, angle ends, attach to card base on left side. Attach tiny green banner at the top as shown with foam adhesive. Add a twine bow.

Print sentiment and die cut. Attach to card base with foam adhesive.
Add liquid pearls or other embellishments as desired.

Thanks for stamping by....

Let's go Shopping:
Kraft Card stock
Natural Twine

5

Personalized Place cards


Hello, friends. Can you believe the Holidays are right around the corner? For those of you that will be celebrating Thanksgiving, how sweet would these cute place cards be on your festive table? Super easy to make and your friends and family will love the extra touch.

Let’s make some Place Cards….


I started with a small rectangle, added a scallopped circle and welded them together.


In the screen print below, I am demonstrating how you make the names for your place cards. To make them easier to attach you will want to weld the letters together.


I cut a piece of white card stock into a rectangle slightly bigger than the name card. Make a tent from this piece and attach place card. Ink edges as desired. Attach flower, faux stitching and individual names.
NOTE: Run a black marker around the edge of the names to cover the white card stock coming through.


I hope you have a wonderful Thanksgiving (for my USA friends). And would love for you to join my blog and leave me some love.

Thanks for stamping by…..

Let's go Shopping:
DCWV patterned paper - Natural


1

Outlawz Happy Holiday


Hello friends....Wanted to make a short post before I am off to visit my mother for a few days.
Somewhere along the way I found this blog called Outlawz and it looks like so much fun that I had to join in.
The challenge was to use things on your card that were destined for the trash can. 
The only thing that was added to this card was the flower, and cording.

Thanks for stamping by...

Let's go Shopping:
Patterned paper (MME Lost & Found Christmas)
Metallic Bronze card stock (Michaels)
Fancy Lattice & Flower Creations(Spellbinders)
Memento ink Olive Grove (Tsukineko)
Gold Braid (Kreinick)
Faux Bronze Pearl (Michaels)

2

Featured in CardMaker Magazine

Featured in CardMaker Magazine November 2012


A huge thanks to CardMaker magazine for publishing this card in their November 2012 issue.
This card is also the Free Project on the CardMaker Magazine website.
Click here for a full tutorial and supply list.

Thanks for stamping by.......


2

Time with a Friend


Hello crafty friends. I wanted to make a little something different this week, so today I have a Twisted Easel card.
I LOVE this 6 x 6 patterned paper from My Mind’s Eye. It is so feminine looking and made this card super easy.
Grab your Scor-Pal, paper and Scor-Tape and

Let’s Make a Card…


Cut heavy card stock (I use watercolor paper) at 9 3/4 x 4 1/4 inches.
This card will end up as a standard size card for mailing.

Score at 5 1/2 inches. On the smaller side, you will want to score the card on the diagonal. Use your bone folder to make a sharp crease. I intentionally made the picture below look 
dark so you could see the lines on the card scored at an angle.


Decorate inside of the card as desired by layering patterned paper that has been matted to fit the 5 1/2 x 4 1/4 section. Attach to base card.

For the outside of the card (the smaller section). You will want to mat your patterned paper sized for 4 1/4 x 4 1/4 and dry fit to one side of the diagonal section (so you have the pattern going in the direction you want). Attach to card base.


Picture above shows Scor-Tape attached to one side of the diagonal fold. Picture below shows the matted diagonal section from the back side.


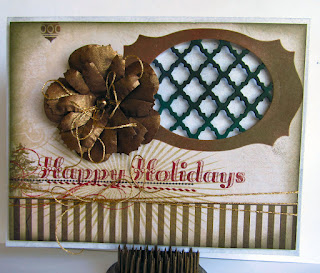
Below picture shows how the card will look closed.


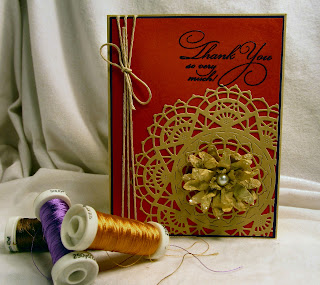
Decorate front as desired. On this card I used a couple of die cuts, sentiment and goosebumps. I used a paper flower colored with copics as a “stopper” on the inside of the card (Shown below).


Behind the flower is a nice size area to write a personal sentiment.


Thanks for stamping by…..

Let's go Shopping:
Watercolor paper (Strathmore)
Blue Cord (Darice)
Patterned Paper (My Mind's Eye - Moments)
Flower (Michaels)


1
Back to Top