Believe


After seeing this style of card on the Paper Craft Planet blog, I just had to try one out.
 I LOVE how it turned out.
Tomato Red card stock was stamped with a very old stamp using Love Letter ink. "Draped" portion of card is patterned paper. Of course the image is the Fairy Stardust stamp from Penny Black Inc. After tying bow, the whole thing was then attached to textured green card stock with Xyron Mega Runner. Sentiment was cut with Silhouette and zipped through my Create A Sticker.
Entering this little cutie into a couple of challenges.

Thanks for stamping by...........
4

Tiny Treasure Box


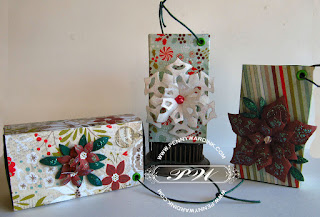
 I have a really quick treasure box for you to make and give away or add to your tree. A tradition at our home is to find a tiny gift on the tree, and these cute treasure boxes could hold a small piece of jewelry, or a handmade gift certificate, etc. Maybe you could start a new tradition of your own this year.

Get your Scor-Pal and card stock and
Let’s make a box…..

matchbox2


matchbox3

For one box you will need card stock cut at 4 1/2 x 3 1/4 inches. Score at 7/8 inches on each side. Cut a slit from edge to score line along both long edges as shown above. Use Scor-Tape on “flaps” of short ends to make a box.

matchbox4

For the “Sleeve” of the matchbox, you will need a piece of card stock or Patterned paper measuring
6 x 2 3/4 inches. Score at 1”, 2 1/2”, 3 1/2”, 5'”.
Crease along score lines and glues ends together making a “sleeve”.

matchbox5

Slide box into sleeve. Attach an eyelet as desired, tying a knot with cording to make a hanging ornament.

You can then decorate to your hearts desire. In these examples, I attached a Spellbinders Poinsettia & Snowflakes.
Tied with a bow, these small Matchboxes would make a great gift holder for a Teacher, Postal Worker etc.

I hope you have a wonderful Holiday.
Love & Liquid Pearls,
Penny

Let's go Shopping:
Dark Green Card Stock 6 x 6 pad
Aspen Frost Patterned paper (Basic Grey)
Crop a Dile eyelet punch
Green cord

1

Holiday Tags


Hello paper crafting friends, how about some holiday tags that you can make in no time. With just a few more days until Christmas, your holiday cards are probably finished and the shopping is done. Now all that is left is wrapping and tagging the gifts.

These cute little tags are super easy and fast to make.

Grab your Card stock, embossing machine and ….

.Let’s Make some Tags.

From left to right for the tags pictured above:

1) Die cut white card stock with Spellbinders Labels Eleven. Stamp and heat emboss in white Stampendous Christmas Background. Ink the tag using Mementos Lady Bug & Pistachio. Fold in half lengthwise, punch hole at top and thread with twine. Die cut a small snowflake from Spellbinders, cover with Stickles and add Rouge Liquid Pearls to center.


2) Cut white card stock 3 x 6 inches, fold in half. Cut another square of white card stock just a bit smaller than tag, using Stampendous Holy Basket, stamp with memento Black Onyx and heat set with clear embossing powder. Color with Copic markers. Ink edges with Memento Lady Bug. Attach to note card, punch hole in corner and tie cords/ribbons as desired.


3) Die cut white card stock with Spellbinders Labels Twenty-five. Ink with Mementos Danube Blue and Nautical Blue. Flick water onto tag to make water spots in ink. Let dry. Stamp sentiment Tinsel Tangle by Stampendous and heat set white embossing powder. Hole punch top, tie ribbons/cording. Die cut small snowflake by Spellbinders, color with Silver Liquid Pearls, attach to tag and finish with a dollop of Royal Blue Liquid Pearls in the center.


I hope you have a wonderful holiday and 
thanks for stamping by.....

1

Celebrate

Featured in CardMaker Magazine November 2012

Huge Thank you to CardMaker Magazine for selecting my artwork for publication in their magazine.

For a complete list of supplies and tutorial on this card, click here to go to CardMaker website.

Hope you are having a crafty day and as always.....

Thanks for stamping by.....
1

Joy


Hello my scrappy friends.... I figure by now you have at least a few holiday cards made. But we are coming down to the wire and this simple card you will be able to whip up in no time. Stamp, Color, Score and run through your Cuttlebug, done.

Let’s Make a Card…..


Joy1

Cut White card stock 4 1/2 x 3 1/4 inches. Stamp image towards the top, color with Copics. Stamp and heat emboss sentiment below.

Joy2

Using your Scor-Pal, score lines along image and sentiment as shown. (I like to line my scoring along the 6 1/4 inch mark on the Scor-Pal as I love the three tiny score lines next to each other).

joy3

Cut Black Magic card stock 5 1/2 x 4 1/4 inches, emboss with Pinking Stitch folder, sand emboss (how cool is this paper letting a different color show through after sanding). Trim just so the pinking is at the edge.


Adhere colored image section to the Black Magic section with Scor-Tape. Tie Black/White twine around this piece, then adhere to card base made from heavy card stock measuring 5 1/2 x 4 1/4.


Thanks for stamping by....

Let's go Shopping:
White heavyweight card stock (Gina K Designs)
Black Magic card stock (Darice)
Black/White twine
Precious Nativity (Stampendous)
Winter Wonders (Penny Black)
Memento Onyx Black ink
Clear embossing powder


1
Back to Top